Tag: recipes

  • Maple Butter Calendula Popcorn

    Maple Butter Calendula Popcorn

    tiny peasant maple calendula popcorn ingredientstiny peasant herb fairies + popcorntiny peasant empty popcorn bowl  

    Well, we did intend to bake some sort of calendula muffin – different from last week’s – but the day sort of got away on us. It felt more like a lazy kind of day, anyway, and so a big bowl of popcorn suited us just fine. It had been a while since we’d had popcorn, as we hadn’t been going to the food co-op we’re a part of and were missing out on the organic popcorn they source.

    So we ended up making calendula popcorn rather than calendula muffins. What goes with calendula? I sure didn’t know – but took a guess that almost anything paired with butter and maple syrup would be amazing. And it was. It might be a contender for the go-to of honey-butter-salt or honey-coconut oil-salt around here.

    To make Maple Butter Calendula Popcorn, just pop a batch sized to suit your family, and then you’ll have to eyeball how much butter, maple syrup and calendula to add. Or you can try this:

    :: 1/2 cup butter

    :: 1/2 cup maple syrup

    :: 1/2 cup dried calendula flowers

    :: 1 big family sized bowl of popcorn

    :: generous sprinkles of sea salt


    This post has been shared as a part of Thank Goodness It’s Monday at Nourishing Joy, Fat Tuesday at Real Food Forager, Simple Lives Thursday at My Humble Kitchen, Fight Back Fridays at Food Renegade, Unprocessed Fridays at Girl Meets Nourishment, and Simply Natural Saturdays at the Pistachio Project.

  • Calendula Banana Muffins

    Calendula Banana Muffins

    tiny peasant calendula banana muffins     tiny peasant calendula muffins buttertiny peasant calendula muffins sugar tiny peasant calendula muffins eggtiny peasant calendula muffins calendulatiny peasant calendula muffins greasetiny peasant calendula muffins spreadtiny peasant calendula muffins buttered

    Our go-to muffin recipe, Choco-Banano Muffins are always a hit. It’s a recipe that has been shared among friends time and time again and is based on a banana muffin recipe from The 250 Best Mufffin Recipes by Esther Brody. This past week, since we were learning about Calendula, we adapted the recipe to be Calendula Banana Muffins. They were fantastic! We all hope you enjoy them as much as we did. Feel free to sub gluten free flour without making other changes – they turn out really well for us.

    CALENDULA BANANA MUFFINS

    Ingredients

    :: 2 cups spelt flour

    :: 1 cup unrefined sugar, such as sucanat or panela (we use a bit less than a full cup)

    :: 1 egg

    :: 1/2 cup butter, coconut oil, or applesauce

    :: 1/2 cup dried calendula flowers

    :: 2 ripe bananas, mashed

    :: 2 tablespoons milk of your choice

    :: 1 teaspoon (tsp) salt

    :: 1 1/2 teaspoons baking powder

    :: 1/2 teaspoon baking soda


    Instructions

    1. Beat together the butter, sugar and egg until well incorporated.

    2. Using a mixer or wooden spoon, add in and mix the mashed bananas, milk, vanilla, baking soda, and baking powder, followed by the flour and chocolate chips.

    3. Scoop into greased muffin tin, filling 2/3 full.

    4. Bake at 350F for 20 minutes.

    5. Cool for five minutes before removing from tin and placing on a cooling rack. Enjoy!


    This post was featured on Girl Meets Nourishment, and shared as a part of Natural Living Monday, Thank Goodness It’s Monday, Fat Tuesday, and Simple Lives Thursday, Unprocessed Fridays, Fight Back Friday, and Simply Natural Saturdays.

  • Elderberry Syrup

    Elderberry Syrup

    It was bound to happen sooner or later – one of the kids has a cold. Aside from the rare sniffle or cough, we have been healthy all fall and winter – with much credit, I think, to the many healing drinks (see some here, here, and here) and nourishing foods (see some here and here) we’ve been enjoying.

    I suppose because we haven’t felt a great need to, I haven’t made elderberry syrup yet, though I’ve had elderberries from this wonderful herbal establishment for months. Today our little one’s sniffles signalled that it would be a great time to make some.

    After searching online a few places, I ended up making a simple recipe based on the amount of dried berries we had on hand. I added some foraged rose hips since we didn’t have many elderberries!

    elderberry syrup ingredientschocolate elderberry syrup tiny peasant

    Ingredients:

    • 1/3 cup dried elderberries (I wasn’t planning to write a post when I started making the syrup, and neglected to take a picture of the dried elderberries. You can see them in the second photo, which is of our chocolate elderberry syrup ingredients).
    • 3 tablespoons dried rose hips
    • 1.5 cups water
    • 1 teaspoon cinnamon
    • a bit of grated ginger or just a 1″ piece of ginger, peeled
    • 2-3 tablespoons honey (vary depending on how sweet you’d like your syrup)

    Directions:

    1. Add the water, elderberries, rose hips, cinnamon, and ginger to a pot.

    2. Bring to a boil, and then simmer on low for 30-40 minutes.

    3. Using a sieve, strain and mash the berries, getting out as much goodness as you can!*

    4. Once the syrup is still warm, but not hot, add the honey.

    5. Pour off into a canning jar or bottle and use as needed. Store in the refrigerator.

    Note: After I strained my syrup, I was staring at the berries and wondering how to extend them – if I could get another, smaller, batch of syrup. Then Brittany from The Pistachio Project tweeted a great idea for getting more out of the berries. Perfect.

    Optional: We LOVE adding star anise to our syrup, and keeping it in the jar or bottle in the fridge so that it tastes more and more like licorice each day!

    Alternate: We’ve also made chocolate elderberry syrup which is delicious for pancakes, waffles, etc.

    bottling elderberry syrup copystraining elderberry syrupbottled elderberry syrup


    This post was shared as a part of Simply Natural Saturdays and Simple Lives Thursday.

  • How to Make Hummus

    How to Make Hummus

    The most loved hummus around these parts is sun-dried tomato hummus. The sun-dried tomatoes lend such a lovely and deep flavour, making it a nice dish to bring along to a potluck, or to use for simple lunches and snacks.

    tiny peasant hummus banner

    Ingredients

    • 2 cups soaked, cooked chickpeas (head over here for info on how to soak, cook and freeze dried chick peas)
    • 6 sun-dried tomatoes (we prefer rehydrated dry, rather than in canola or another vegetable oil)
    • 2 cloves garlic (this is mild enough for our kiddos – adjust to your family’s preference)
    • 1 teaspoon sea salt (much more shown in the photo!)
    • 1/4 cup extra virgin olive oil
    • 2 tablespoons lemon juice
    • 1 tablespoon tamari soy sauce


    Directions

    1. Put all of the liquid ingredients into your blender or food-processor, followed by the dry ingredients, ending with the chick peas.

    2. Blend the ingredients together until desired consistency is reached.

    3. If desired, swirl some extra virgin olive oil in a dish with the hummus, and enjoy! Any extra hummus can be stored in the fridge for short term eating or frozen for use later on.

    hummus ingredients in blenderchick peas blenderhummus lovin'hummus lovin crew 


    This post was shared as a part of Natural Living Monday,  Thank Goodness It’s Monday, Fat Tuesday,  Simple Lives Thursday, Unprocessed Fridays, Fight Back Fridays, and Simply Natural Saturdays.

  • Repurpose Your Real Christmas Tree

    Repurpose Your Real Christmas Tree

    This post is an excerpt from a previous post about choosing a Christmas tree.

    If you had a fresh cut tree and if it is organic or pesticide-free, consider honouring your tree by using all of it, or as much of it as you can. After your celebrations are over, harvest the pine needles for use in healing teas and other recipes. Pine needle tea is high in vitamin C and is supposed to be good for whooping cough. Local expert Laura Reeves says that though pine needles are great for breaking up phlegm, she sticks to the tea and chewing on the needles as the syrup is quite “medicinal-tasting”. Read on for a roundup of recipes and DIY tree trunk crafts…

    mike with cut tree


    Pine Needle Recipe Roundup

    Please do not consume anything that has not been properly identified. If you’re not sure, seek out a local professional.

    Pine Needle Tea (really cute video instructions here)

    Pine Needle Vinegar

    Pine Needle Juice/Cocktail (swap agave for honey!)

    Pine Needle Cake (I recommend subbing in unrefined sugar and whole flours) – some good info here on tasty varieties

    Pine Needle Syrup (again, sub an unrefined sugar or honey)


    DIY Tree Trunk Crafts Roundup
    You can also use the trunk for making crafts –  simple slices of trunk for block play, coasters, decorations, and if you carve or have access to tools like a drill press, then the options are many (think candle holders, wooden spoons, wood toys, and more. Below are just a few ideas…

    Pencil Holder

    Wood Blocks for Kids

    Tree Branch Fridge Magnets

    Tree Branch Coasters


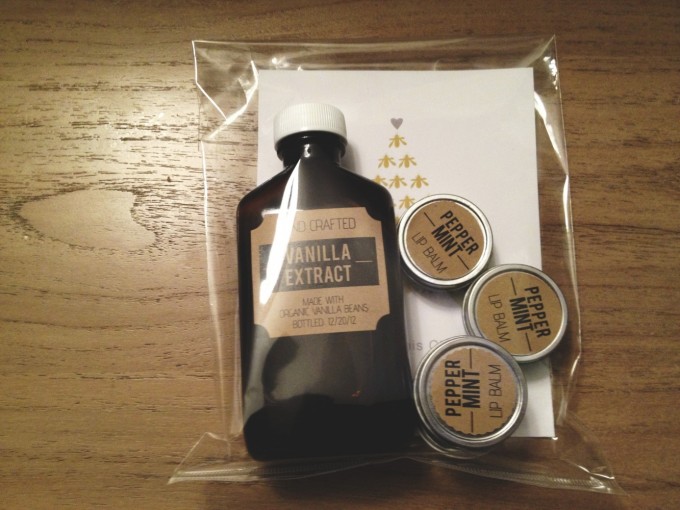
    Get some valentine’s day or year end teacher gifts ready to go with my printable vanilla labels!

    vanilla packaged


    This post was featured at Thank Goodness It’s Monday and was shared as a part of Simple Lives Thursday,  Fight Back Friday,  Unprocessed Fridays and Simply Natural Saturdays,  Natural Living Monday, and Fat Tuesday.

  • Simply Healthy Fudge

    Simply Healthy Fudge

    This is some seriously simple fudge! With some nourishing ingredients, and no added sugars, I’m thinking it is going to make an appearance several times in 2014! We made this our official December recipe for our 10 year old’s baking program, which means we *had* to make it three times. Ahem.

    We  decided to make it a candy cane fudge, by adding some crushed candy cane and peppermint to the mixture and more crushed candy cane on top. Of course, this isn’t a super healthy fudge anymore, but the basic recipe is sugar free and you can easily keep it that way! There are a lot of suggestions at the end of the post for other flavours, many of which sound so good, and good for you.

    BASIC RECIPE

    Ingredients:

    • 2 cups dark, fair trade chocolate (we used cocoa camino baker’s chocolate and topped off with enjoy life chocolate chunks because we didn’t have enough cocoa camino left to make 2 cups – note that the chunks have sugar, so I recommend the straight dark chocolate)
    • 1 cup coconut milk (the thicker part from the top of the can)
    • pinch of sea salt

    candy cane fudge ingredientscandy cane fudge crushed

    Instructions:

    1. Break up chocolate, if necessary.

    2. Add all ingredients to a double boiler and melt over low heat.

    fudge heating up

    3. Add any optional ingredients.

    adding extras - fudge

    4. Pour into a square baking dish lined with wax paper.

    fudge finished

    5. Add any optional toppings.

    6. Set in the fridge.


    FLAVOURS TO TRY:

    I am super excited to try some of these in the near future. Particularly, maple walnut, toffee + salt, and orange + macadamia. Yum.

    • candy cane / peppermint
    • vanilla
    • maple walnut (maple syrup + walnuts)
    • pumpkin
    • toffee + salt
    • peanut butter (or sunflower butter, etc.)
    • coconut
    • orange zest + macadamia nut
    • white chocolate + cranberry

    What is your favourite kind of fudge? Share in the comments!


    This post was featured at Thank Goodness It’s Monday and Simply Natural Saturday, and shared as a part of Natural Living Monday,  Fat Tuesday,  Simple Lives Thursday, Fight Back Friday, Unprocessed Fridays, and Simply Natural Saturdays.

  • Advent Week 2 Activity :: How to Make Vanilla

    Advent Week 2 Activity :: How to Make Vanilla

    If you’re following along with our Advent series, you can find the original post here, and the Week 2 overview here.


    Making vanilla is worth it just for the smell alone. I had a pile of little ones on my lap after I wrapped up, just because my hands carried the sweet scent of fresh vanilla beans.

    This is one of the easiest kitchen projects you’ll come across and you reap the reward of a high quality product at a fraction of the cost of store-bought organic vanilla. This made great a great gift for friends and teachers last year and would make a lovely hostess gift.

    Let’s look at the cost breakdown.
    I purchased a 1.14 L (1140 ml) bottle of vodka for $31.25. This works out to 11.4 bottles, if using 100 ml bottles like I was. Since the vanilla beans displace some of the liquid, let’s say we can get 13 bottles from 1.14 L. That works out to $2.40 per bottle for the vodka. My vanilla beans cost about .55 per bottle, plus my bottle cost which was about $1.30 each. This brings me to $4.25. I’ll add on .25 for the labels, for a grand total of $4.50 for vanilla made with organic beans (though not organic vodka). Great. Now some of you know how much your Christmas gift cost. ; )

    You really don’t need to use the amber bottles, and can use whatever you have on hand. In fact, if you’re making it just for yourself, you can go ahead and toss the correct ratio of vanilla beans right into your vodka bottle. Take off the $1.30 per bottle, and you are down to $3.20 for 100ml.

    Here in Manitoba, a local supplier carries organic vanilla at over $15 for 118 ml. Wow. On Amazon, I could only find 59 ml bottles, which retailed for over $10.

    If you’re doing this activity with children, try working with them (or if they are old enough they can do it on their own) to figure out your costs of production…

    Ingredients

    • High quality vanilla beans (we use organic beans from Real Raw)
    • Vodka – you can use any vodka – organic would be nice to avoid gmo ingredients, but use whatever you can get your hands on. You can also use other alcohols such as rum, brand, or bourbon.
    • Bottles – we use 100ml amber bottles, as I like to give these as gifts over the holidays. You can use almost any kind of jar you have on hand, as long as it is clean and seals well.
    • Funnel
    • Knife and cutting board

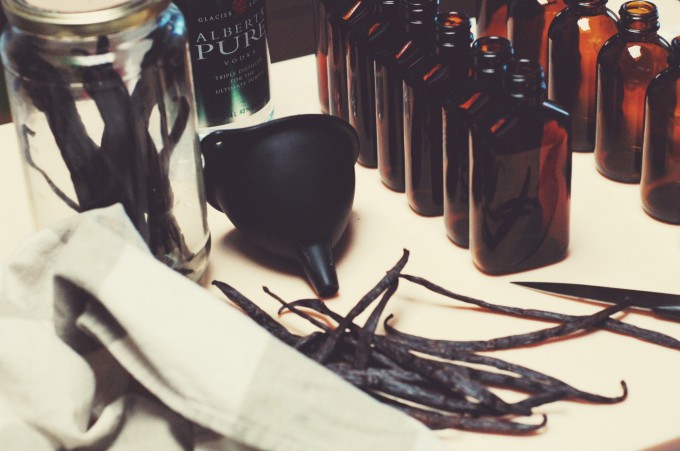
    vanilla supplies

    Instructions

    1. The ratio for vanilla is 6 vanilla beans per cup of alcohol (though I’ve heard as few as 3 per cup and as many as 8 per cup). I used 2.5 beans for each 100ml bottle.

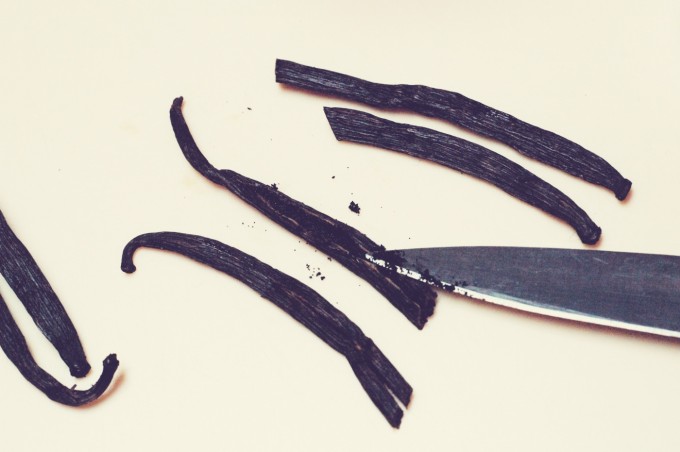
    2. Slice the beans lengthwise, just enough to open them up – not to slice them in half. This allows the vanilla flecks to get out and mingle with your alcohol.

    3. Slice the beans in half if necessary to fit into your jars or bottles.

    split the bean

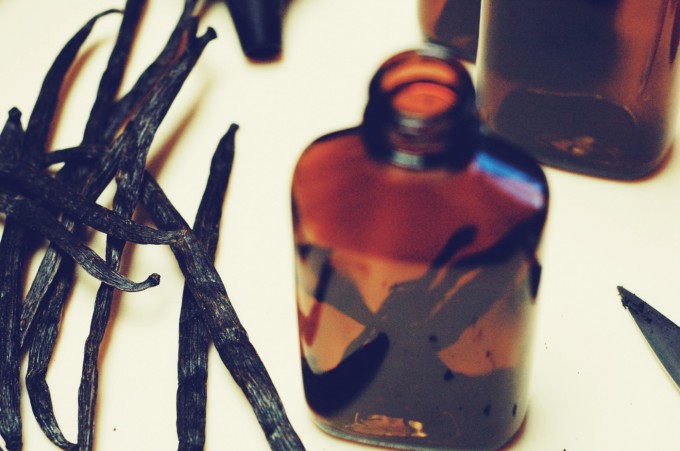
    4. Place the beans in your jars or bottles.beans in the bottle

    5. Using a funnel, fill the jar, leaving some air space, and seal.add the alcohol

    Place in a dark cupboard for 6 – 8 weeks, giving it a shake each day, if you think of it. Sampling is allowed. Ahem.

    Once you’ve used up your vanilla, you can add more vodka to the bottle, and add scraps of vanilla beans if you collect them while baking – or just add another whole bean.

    Vanilla makes a great gift. With a simple raffia ribbon or popped into a nice package, the bottles of vanilla themselves make a beautiful gift and require no fancy gift wrap. Print out our labels to make your bottles extra special. The front label has basic info, and the back has instructions for the person receiving the vanilla, so they will know how long to let it sit, and how to replenish it once it is used up.

    vanilla packaged


    This post was featured over at Real Food Forager and Girl Meets Nourishment, and shared as a part of Thank Goodness It’s Monday, Natural Living Monday,  Fat Tuesday, Simple Lives Thursday, Fight Back Friday, and Unprocessed Fridays.

  • The Great Christmas Tree Dilemma

    The Great Christmas Tree Dilemma

    We’ve been married for over eleven years and have had little ones for over six of those. Ever since we were married, we made a commitment to live simply, to respect the environment, and to create a peaceful and warm home environment. So, where do Christmas trees fit in to all of that?

    Mike’s family had some real trees here and there, though we both grew up mainly with plastic trees. Were our Christmases any less special? Absolutely not. That said, we love the smell and look of a real tree and so that is what we did for a few years. Until we realized we were buying chemically treated trees, and well, cutting down trees. 

    So, what did we end up doing instead of plastic or the regular store-bought “fresh”cut trees? We haven’t found a perfect solution, and below are a few things we have explored.

    decorating tree 3

    1. Potted Norfolk Pine

    For a year or two, we choose to purchase a potted topical pine tree, called a Norfolk Island Pine. These are a fantastic option for:

    • Anyone living in a small space
    • Folks who want to simplify on the consumer side of Christmas and keep it small – smaller tree, fewer decorations – and just a few gifts look like a mountain under these babies!
    • Those who want something real without cutting down a tree
    • Someone with a green thumb – these plants don’t take care of themselves and have to be misted and cared for. We killed ours even though I garden a lot, and then realized we weren’t really much ahead of where we’d be in our mission for simplicity and care for the environment had we bought a cut tree.


    2. Natural, Fresh Cut Tree

    We did a lot of reading about Christmas tree options, and have read articles that tout plastic trees as more environmental due to their longevity and reusability, the fact that they aren’t cutting down oxygen producing trees, etc. We still didn’t feel that plastic was something we wanted in our home – particularly at that magnitude. So, we circled back to fresh cut trees. We are fortunate to have a couple pesticide-free tree growers in our province (Country Pines in Tyndall and Eden Ridge near Steinbach, for those in Manitoba). You can go and pick your own to cut and warm up with hot chocolate while you’re on their beautiful farm. This has proven the best option for our family over the past several years. This is a good option for us because:

    • We get an organic tree that is free of pesticides and doesn’t off-gass. We also learned that many Christmas tree growers actually spray their trees green. Our local grower said they already weren’t using chemicals or this paint procedure and so started to share those facts with consumers. We are delighted.
    • We love the warm, inviting nature of our real trees – the smell, the feel of the needles and bark…
    • The farmers plant more trees. They produce oxygen. This is good.
    • We get to support a local organic farming family!

    mike with cut tree hot cocoa at tree farm at the tree farm

    If you get a fresh cut tree and if it is organic or pesticide-free, consider honouring your tree by using all of it, or as much of it as you can. After your celebrations are over, harvest the pine needles for use in healing teas and other recipes. Pine needle tea is high in vitamin C and is supposed to be good for whooping cough. Local expert Laura Reeves says that though pine needles are great for breaking up phlegm, she sticks to the tea and chewing on the needles as the syrup is quite “medicinal-tasting”.

    Pine Needle Recipe Roundup

    Please do not consume anything that has not been properly identified. If you’re not sure, seek out a local professional.

    Pine Needle Tea (really cute video instructions here)

    Pine Needle Vinegar

    Pine Needle Juice/Cocktail (swap agave for honey!)

    Pine Needle Cake (I recommend subbing in unrefined sugar and whole flours) – some good info here on tasty varieties

    Pine Needle Syrup (again, sub an unrefined sugar or honey)


    DIY Tree Trunk Crafts Roundup
    You can also use the trunk for making crafts –  simple slices of trunk for block play, coasters, decorations, and if you carve or have access to tools like a drill press, then the options are many (think candle holders, wooden spoons, wood toys, and more. Below are just a few ideas…


    Pencil Holder

    Wood Blocks for Kids

    Tree Branch Fridge Magnets

    Tree Branch Coasters


    3. Live Potted Tree (to plant after the holidays)

    Another option – and probably the best one, that I haven’t found here in Manitoba is to purchase a live, potted Christmas tree. If you’re lucky, you’ll have a place like this in your city… Decorate and care for the tree through the holidays and then find a special spot to plant the tree in your yard or elsewhere after the holiday season. Some of these companies rent you the tree and then plant it afterwards for you. This is truly our favourite option, if only we could figure out the details!


    Happy Tree Hunting!

    I hope you will find some inspiration here as you hunt for the perfect Christmas tree. Please note that these ideas are based solely on our personal opinions and preferences. I’m sure there are myriad articles on the merits of plastic trees vs cut trees and vice versa. I think that if you are giving this some thought, that you are on the right path in finding the best solution for your family. And that is what matters most.

    Share your tree ideas in the comments!


    This post was shared as a part of Simple Lives Thursday,  Simply Natural Saturdays, Thank Goodness It’s Monday, and Natural Living Monday.

  • Heirloom Offerings :: Rice Pudding

    Heirloom Offerings :: Rice Pudding

    This offering to Heirloom Offerings :: The Grandma Project was contributed by Kris Antonius. Are you interested in sharing? Read our submission guidelines and get started.


    It’s almost effortless to conjure up the sweet aroma of grandma’s rice pudding baking in the oven. It was a smell that occupied her entire home, and still occupies my memories. Thanks to my grandma and my mom, my little ones will grow up sharing this memory, but in the context of our home.

    Little has changed in how we make our rice pudding, from the original that was enjoyed in grandma’s kitchen so often years ago. She baked; we cook it on the stove top most of the time. She added eggs; we have a little one with an egg allergy, so unless we make two dishes, we go egg-free. A few tiny subs or additions here or there, depending on the day – but in the end, it is still the warm, homey, comforting dish I recall from my childhood.

    What’s great about rice pudding is that if you’re not using refined sugar, if makes a wonderful dessert or breakfast. We’ve even had it for lunch. And snack. It’s just that good. Especially when it’s made in Gran’s casserole and eaten out of her fancy dishes.

    rice pudding gran's dishesrice pudding and chai tea


    Grandma Amey’s Rice Pudding

    Ingredients (our updated substitutions in parentheses)

    • 3 cups cooked rice (organic whole grain brown or wild rice)
    • 1 apple, chopped (unpeeled)
    • 1/2 cup raisins (organic)
    • 1 1/2 cups milk or cream (organic milk or cream, or homemade almond milk)
    • 1 egg (from a local farm)
    • 1 teaspoon vanilla
    • 3 tablespoons sugar (honey or panela)
    • 1/2 teaspoonCinnamon

    Our Additions:

    • Virgin coconut oil or coconut butter
    • Sometimes a combo of: sunflower seeds, almonds, walnuts, hemp seed


    Instructions

    As far as I recall, Grandma never used a recipe. She simply made a pot of rice, and added the other ingredients by sight or intuition. I don’t think she ever heard a complaint! 

    1. Cook rice according to instructions (or use leftover rice – I often cook extra rice when making a meal for this purpose)

    2. Chop the apples. Grandma would have peeled them. We leave the peel on.

    3. Mix the rice, apples, raisins, milk, egg, sweetener and cinnamon in a casserole dish and bake in the oven at 350 for 30 minutes.

    OR

    Place the rice, apples, raisins, milk, egg, sweetener and cinnamon in a pot and heat on medium-low for 15-25 minutes.

    4. Serve warm or cold with fresh milk or cream or a dollop of real whipping cream.


    Kris Thumbnail

    Kris Antonius has a crew of four budding gardener chefs, ages 3, 6, 10, and 13, and is passionate about good food and learning. She enjoys exploring sustainable farms, food, and recipes with her family and nurturing the seeds that are planted on their numerous food and learning adventures.

    *Photo of Kris by Pauline Boldt.


    For more tips on eating well affordably, check out this post: Fitting Real Foods into the Budget – tips from myself on eating REAL food on a budget and links to some of my favourite posts on this topic.

    real food budgeting roundup


    For time and sanity saving menu planning help, grab our Tiny Peasant Menu Planners & Resources!

    Tiny Peasant Pantry Menu Planners Badge


    This post was shared as a part of Thank Goodness It’s Monday, Natural Living Monday,  Fat Tuesday, Real Food Wednesday,  Simple Lives Thursday, Unprocessed Fridays,  Fight Back Fridays and Simply Natural Saturdays.

  • Heirloom Offerings :: Mennonite Zwiebach

    Heirloom Offerings :: Mennonite Zwiebach

    This offering to Heirloom Offerings :: The Grandma Project was contributed by Maria Epp. Are you interested in sharing? Read our submission guidelines and get started.

    Growing up, I spent a lot of time with my Grandma. She loved to share her skills with us in baking, sewing, crocheting, preserving and house-keeping. Now that I live far away from her, I cherish those childhood memories that much more.

    maria grandmaIMG_8135

    Maria learning to bake in Grandma’s kitchen

    Coming from a Mennonite background meant that there were a lot of traditional foods that we would look forward to each time we visited Grandma’s. Roll Kuchen, Perishky, Wereniki, Borscht and more.  I’ve tried making many of them on my own, but of course, they never come close to Grandma’s!


    The traditional bun was called Zwiebach. Watching my Grandma make the beautiful white dough and squeeze the little balls through her greased fingers was so fun. Trying it myself as a kid was often humbling as I fumbled along, not nearly as fast as she was. These have always been a treat and now that I’m gluten-free I can’t enjoy them any longer.


    Her tricks of the trade were marvellous though. She would use potato water and bacon fat to make them fluffy and rich! Re-using a meal, rather than throwing those parts out. This type of thrifty cooking was not only tastier but meant that there was a rhythm to each week. There was no money to buy a quick loaf of bread. Everything was made from scratch, over and over again. The recipes were tried and true and the routines were depended on and cherished.


    As a kid, I was comforted by the familiar. The same recipes became our favourites. It may not have been the healthiest, but I still long for the simpler, more grounded life that was shared by my Grandma. No surprises. No doubt, that the food was good, the home welcoming and the love strong.


    maria grandma 2
    Passing on the tradition to the Great Grandchildren


    Here is the Zwieback Recipe (unaltered):


    • 1 package yeast
    • 2 cups warm potato water
    • 4 cups milk
    • 2 eggs
    • 2 level tbsp. salt
    • 1 cup shortening (or bacon fat)
    • 1 cup margarine


    1. Sprinkle yeast into warm water, cover and let stand 10 minutes.
    2. Scald milk.
    3. Beat eggs well, and after milk has cooled somewhat, add eggs and salt slowly.
    4. When still warm, add yeast mixture and beat in enough flour to make sponge.
    5. Cover and let rise until light, 1 to 1 1/2 hours in warm place, free from draft.
    6. When light add shortening, which has softened at room temperature, and enough flour to make a smooth elastic dough.
    7. Knead well.
    8. Cover and let rise until double in bulk, punch down and let rise again.
    9. Punch down and set buns on greased cookie sheets (You pinch off round pieces, and after your pan is filled you pinch off somewhat smaller pieces and put these on the first bun, and put your thumb in the centre right down, to hold these two balls together.)
    10. Let rise until light and bake in 375°F oven for 20-25 minutes.

    {Kris}: I love that Maria’s family recipe can get a quick whole foods boost without compromising the recipe by simply using butter in place of margarine, sea salt instead of table salt, and perhaps experimenting with different flours.

    maria bio photo

    Maria Epp is mom to two beautiful girls, partner to Nathan, and creative explorer with a passion for nature and working with her hands.

    {Kris}: Those photos are oozing with sweetness! What a special experience for your girls to bake with their great grandmother and carry on the traditions of your family. Our family bread tradition is for all the women to gather to make paska (easter bread) each year.  Thank you for sharing this!

    Share your family’s traditional foods in the comments. What do you remember your grandmother (or other significant person in  your life) making when you were a child?